
Launch a VPS
Create a new server from your Cloud pool, choosing the OS, password, size and owner.
Launch VPS creates a new server from the resources in your pool. The server is deployed in about a minute and starts on its own.
Before you begin, check in Cloud Resources that you have a free virtual machine, an IPv4 address and enough RAM, cores and disk.
Open Launch VPS
Click Launch VPS under Compute in the left sidebar, or Launch VPS at the top of List VPS. The form is on the left and a Summary of your choices on the right. The Virtual Server button at the top is the one in use; the Bare Metal button next to it is not covered here.
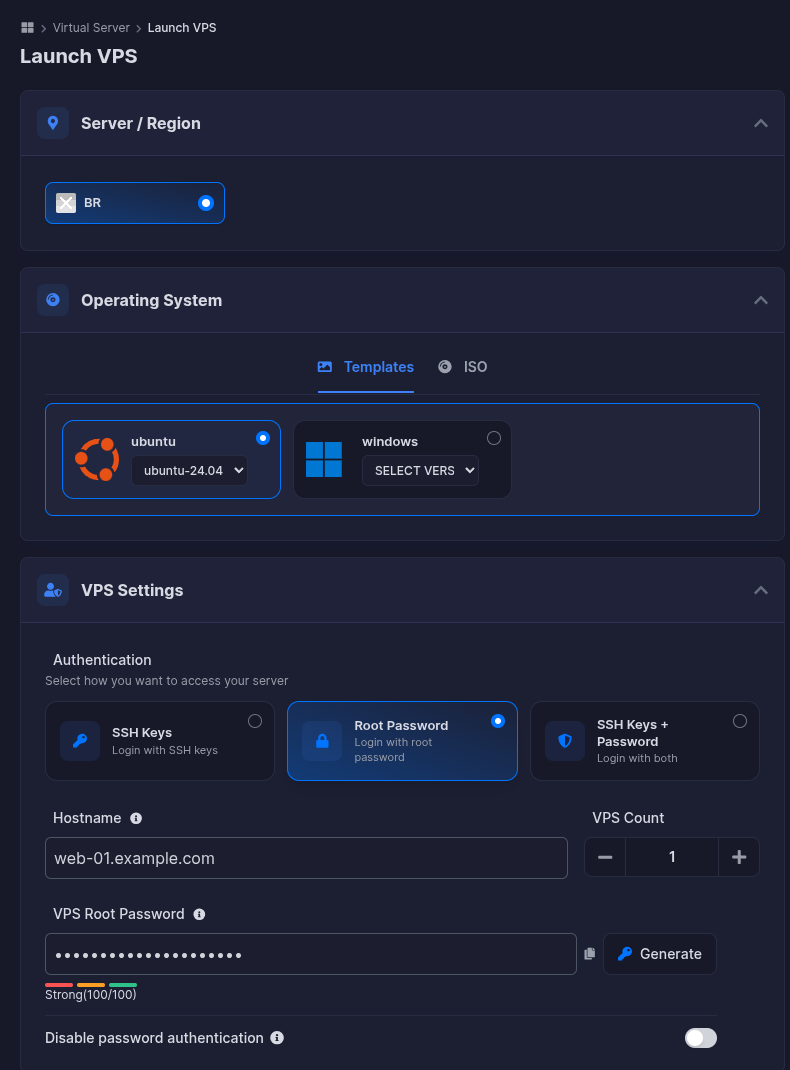
Pick the region and the operating system
Under Server / Region, keep the BR region selected. Under Operating System, open the Templates tab, choose ubuntu or windows, and pick a version from the drop-down inside the card.
The templates available are:
- ubuntu:
ubuntu-20.04-x86_64,ubuntu-22.04.5-x86_64,ubuntu-24.04-x86_64 - windows:
windows-2016-scsi-virtio,windows-2025-virtio-amd64
The ISO tab lets you boot from an ISO image instead of a template.
Choose how you will log in
Under VPS Settings pick one Authentication card:
- SSH Keys: login with SSH keys only.
- Root Password: login with a password.
- SSH Keys + Password: both. This is selected by default.
Type a Hostname (for example web-01.example.com). VPS Count creates several identical servers at once, each using its own share of the pool. For VPS Root Password, type a password or click Generate; a strength indicator shows how strong it is. Use a long, unique password, and change it later from the VPS password page if needed.
If you use SSH keys, pick one in the SSH Keys section with Generate SSH Keys, Add SSH Keys or Use Existing Keys. See SSH keys. If you do not have a key yet, Root Password is the simplest option.
Disable password authentication turns off password login. Leave it off unless you chose SSH keys and have your key saved.
On Windows servers you log in as Administrator over RDP, on Linux as root over SSH. See Connect to the VPS.
Set the size
Under Resources, fill in each size. The grey box beside each field shows how much of your pool is still free.
| Field | Unit |
|---|---|
| Disk Space | GB |
| RAM | MB |
| Swap RAM | MB (use 0 for none) |
| Bandwidth | GB (0 is unlimited) |
| CPU Cores | Number of cores. Required. |
Under Network Configuration, IPv4 Addresses is the number of public addresses for this server. IPv6 Addresses and IPv6 Subnets are available when your plan includes them.
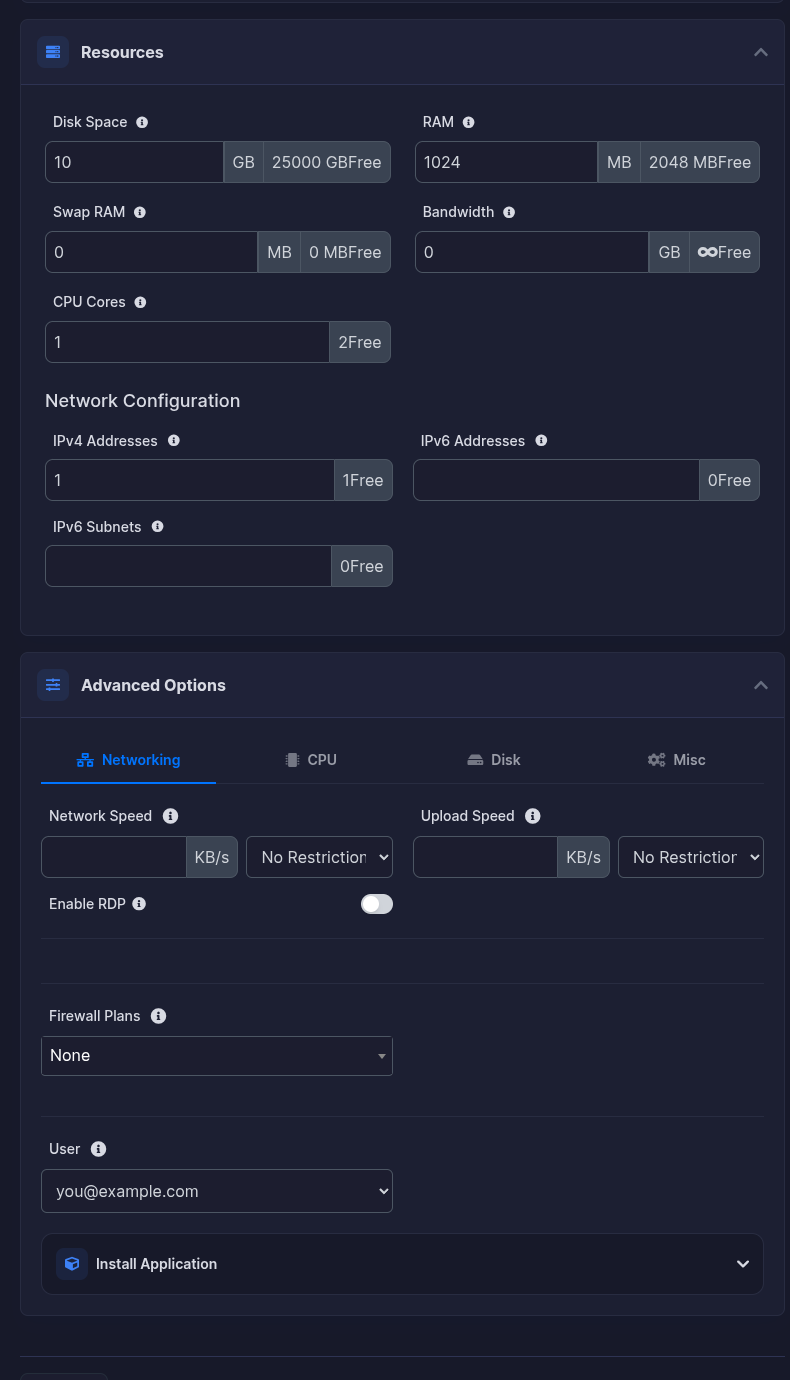
Review the advanced options (optional)
Advanced Options has four tabs:
- Networking: Network Speed, Upload Speed (both default to No Restriction) and Enable RDP.
- CPU: CPU Mode and CPU Topology.
- Disk: Disk Caching.
- Misc: Recipes, to run one of your own recipes after install.
Below the tabs, Firewall Plans is None unless one is defined for you, and User chooses who owns the server. It defaults to your own login. Pick a customer here if you already created a user for them. Install Application lets you install an application with the OS.
Create the VPS
Check the Summary and click Create VPS. A green The Virtual Server has been created message appears and you land on List VPS.
The new server first shows Offline and turns Online after a minute or two. Meanwhile, Tasks shows Create VPS Operation, Installing Guest Agent and VPS Start.
The Summary price stays empty
Monthly Price and Hourly Price in the Summary show a dash. The plan is paid in billing, and what you create inside the pool is not priced per server here.
If creation is refused
The panel shows a red error with the reason. The ones you may see:
| Message | What to do |
|---|---|
| Please specify the Number of Cores | Fill in CPU Cores. |
| You are not allowed to create a VPS with so many cores | Lower CPU Cores. It is above the Max Cores / VPS or the free cores in your pool. |
| You have crossed the assigned disk space limit | Lower Disk Space. It is above the Max disk space / VPS or the free disk in your pool. |
Check Cloud Resources for the limits that apply to your plan. If the Operating System area says There are no OS templates available, or you cannot pick a virtualization type, contact support.
After you launch
- Connect to the server and secure it.
- Manage, resize or delete it from List VPS.